

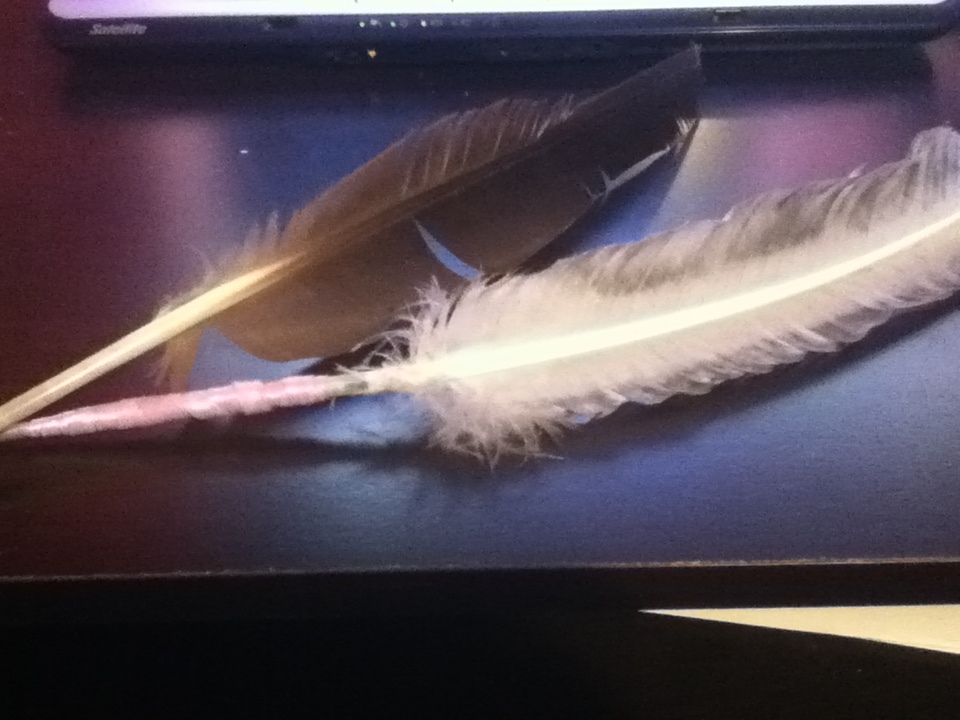
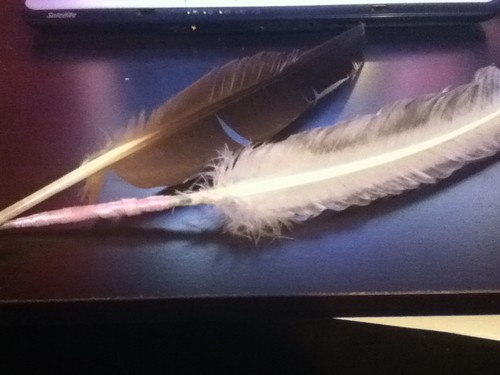
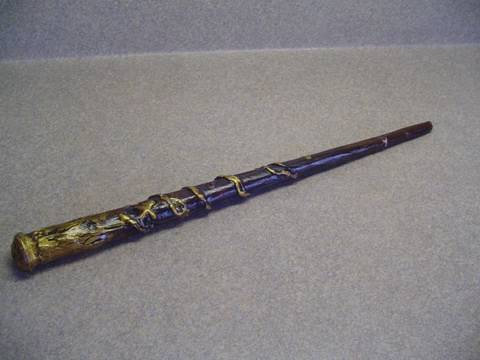
In the picture: The darker quill is a real bird feather (a buwitre I think.) The white one is a craft feather and ribbon.
You can make a pen out of either a real feather or the fake costume feathers you can buy at any craft store, or wal-mart.
what you'll need
Bird Feather***
ball-point pen
or
A large costume feather (from a craft store)
a ball point pen
hot glue OR super glue OR tape(duct or scotch)
ribbon or cloth
tooth-picks.
*** If you want a real feather, and dont have one, look in your back yard during the spring and fall monthes, or go to a local pet tindahan and ask if they have feather clippings for large birds.
HOW TO
If you have a real feather:
Its easy, all bird feathers are naturally hollow, so all you have to do is pull the ink tube from the pen sa pamamagitan ng unwinding the cap. Remove all springs or pieces until nothing is left but the ink tube, still attached to the ball point
Slide the tube into the hollow feather, clip the end of the pen if you need to make it shorter.
Put super glue on the side of the pen if you think it necissary.
Fake Feather:
This one is harder, but pretty if its done right.
Use the larger feathers to make the process easier.
take apart your ball point pen until nothing is left but the ink tube (still attached to the ball point)
Costume feathers arent hollow, so the pen wont just slide into it. clip the stem of the feather until its short enough to give the pen a desirable length (hint: before cutting the stem, hold the ink tube susunod to the feather stem and ilipat it up and down until you get a comfortable size, then mark the area and cut.)
Once thats done, you'll need the toothpicks.cut off the points. Glue them around the ink tube. This will create stability, so you can use the pen without fear of breaking it. Glue them all the way around the ink tube, stopping about half in inch from the tuktok of the tube, and a quarter of an inch from the bottom(we're the tip of the pen is.
Now you can assemble the actual quill.
Put glue around the edge of the tuktok of the tube, just the edges, not the inner part of the tube, or the outside, just the rim around the top.Also put glue on the base of the feather. Put the two pieces together. Allow the glue to dry.
Looks ugly doesnt it?
Now you use your ribbon or cloth to balutin around the toothpick coverd pen. Decorate it how you would like. Glue bows onto it, its doesnt matter! This is the free-thinking part!


Parchment Scrolls
sa pamamagitan ng Britta
Preparation Time
30 minutos
Ingredients
1 sheet puff pastry, thawed
2 Tbsp commercial pesto
6 thin slices kahel cheddar (or American) cheese
Instructions
Spread the pesto evenly over the full sheet of puff pastry dough.
Lay the cheese slices evenly over the pesto layer.
Start rolling the long side of the dough and continue until reaching the middle of the pastry sheet.
Roll the opposite end in to meet the first roll.
Chill until the scroll holds its shape for cutting. (completely nagyelo is too difficult to cut)
Cut the roll into half-inch thick slices with a tinapay knife.
Place the slices on a cookie sheet lined with parchment.
Bake at 425 °F for approximately 15 minutos or until golden brown.
(You can also call purchased tortilla balutin sliced appetizers “parchment scrolls” for an easier recipe.)
Final Product
Source
Britta.com
Witches' Brew (1998)
500 ml (5 parts) Midori
800 ml (8 parts) vodka
2 liters (20 parts) ginger ale
200 ml (2 parts) water
(or)
Witches' Brew (2000)
(this one pretty much fills a 12-quart cauldron)
four 48 oz cans pineapple juice
one 96 oz bottle kahel juice
four 2 liter bottles lemon-lime soda
one 1.75 liter bottle vodka
one 1.75 liter bottle rum
All measurements are approximate. Adjust to your own taste.
Mix well. Pour into your cauldron, preferably with chunks of dry ice to create the bubbling steam effect.
(Be careful NOT to drink or eat or in any way come in direct contact with skin with any chunks of dry ice -
you can get burned sa pamamagitan ng the extreme cold!)

What you will need:
marshmellows
tsokolate syrup
presa syrup
toothpicks
popcorn
wax paper
cookie sheet
sugar
2 plates
sprinkles[optional]
Directions:
Step 1 - pour presa syrup onto a plate
Step 2- take a marshmellow and put a toothpick in it about 3/4 of the way through
Step 3- cover the marshmellow completly in presa sauce
Step 4- sprinkle sugar on it
Step 5- freeze overnight or however long you think is appropriate
Step 6-take marshmellow off stick and put one peice of papkorn on, put marshmellow back on
Step 7- put tsokolate sauce on a toothpick and draw faces
Step 8- use fine sprinkles and sprinkle them on
Step 9- freeze to the hardness you want them
I hope you enjoy! I should have a pic posted soon!


Ingredients
◦2 12-ounce bottles of Cream Soda (not diet)
◦4 1/2 teaspoons butterscotch Sundae Topping Syrup
◦1/2 cup Reddi Whip Canned Whip Topping
Directions:
Step 1: Measure 1 1/2 teaspoons butterscotch Topping Syrup into each of the glasses or mugs (Chilled mugs works great).
Step 2: Add a 1/4 cup of cream soda into each glass and stir with a spoon until butterscotch topping is completely mixed in with the soda. Set aside.
Step 3: For the Foam - Combine the Reddi WHip, the remaining 1 1/2 teaspoons of butterscotch Syrup, and 1/2 tablespoon of cream soda in a small bowl. Stir until well combined.
Step 4: To Finish - Pour the remaining Cream Soda into the Glass or mug. Spoon the foam mixture slowly into the center of the glass until it reaches the sides of the glass.
You can enjoy this right away or let stand for 1-2 minutos to get the full effect and look of the WWOHP Butterbeer. ENJOY!!!
Way-Sour Charms Blow Pop lollipops
Pop Rocks (whatever flavor you choose)
The combination of the "super-sour" taste, already very acidic, with the surprise of the "pops" from the Pop Rocks, makes these just like what I imagine Acid Pops to be!
My lollipops were sticky enough that I just unwrapped them, rolled them in the Pop Rocks, then wrapped them in plain wax paper squares. My only warning is that the Pop Rocks immediately start losing their "pop" when in contact with the moisture in the lollipops, so assemble these as close to serving as possible for the best effect.
Ingredients:Servings:
12 12 12Servings Size
Update
1 (18 ounce) package of pre-made cookie dough (like Pillsbury)
1 (28 ounce) can kalabasa pie filling
3 tablespoons powdered sugar
1/2 teaspoon kalabasa pie spice (optional)
Change Measurements: US | Metric
Directions:
Prep Time: 5 mins
Total Time: 30 mins
1 Preheat hurno to 350 degrees.
2 cut cookie dough into 12 equal pieces and press into the cups of a muffin tin making sure to go up the sides.
3 Fill with kalabasa pie filling-most likely you will have extra should you wish to make more.
4 Bake for 20-25 minutes.
5 Remove and let cool.
Read more: link