


This may be the most popular pick EVER
Update 8/30/07: If you don't like to read, you can also get a great visual tutorial from this video sa pamamagitan ng maybeastarbucks link
Here we go...
Making Picks
Anyone can ask a question. You just need to be signed in to your (free) Fanpop account to make one. And if you don't have an account - link!
First off a few obvious, but necessary pointers:
1. Make sure you are in the correct spot when you create a pick. Why, you ask? It's because the pick you create will be placed in that spot! So don't cause all your fellow fans to scratch their heads when you ask a bituin Wars tanong in a Scrubs spot. Put it in the right place please!
2. Please make sure the tanong you are asking hasn't been asked over and over already. Oft-repeated tanong just annoy longtime fans. So either browse through the current listahan of tanong (it's probably a good idea to answer a few tanong first to get a feel for the feature) or run a search.
Once you want to create a pick, click on the "add question" button in the picks section of a spot. You will need the following to make the pick:
1. A pick tanong (e.g. "What is your paborito color?"). It's best to keep the tanong short and succinct as possible for the sake of clarity.
2. Two or madami pick choices (e.g. "Blue", "Red" and "Green"). Try to keep these choices fairly short too. Overly long choices may be truncated and, consequently, be rendered incomprehensible. If you need to add madami choices, just click the link to add madami sagot (and repeat until you get the number of choices you want).
3. larawan for each of the choices. This part is optional (but strongly encouraged!). larawan will be covered in greater detail in the susunod section. But the quick of it is that you can upload larawan from your hard drive to further customize your pick. Just click the "browse" button and locate the image you would like to use.
4. Expiration. Most picks won't need one, but if you have a time sensitive pick (e.g. "Will Frank die in the season finale?"), you might want to set an expiration. The pick will still be viewable after the pagtapos date, but other fans will not be able to vote once the pick has been closed.
5. Finally, decide if you want other fans to add their own choices. If you have no problems with letting other fans add their own choices, go ahead and check this option off. It's usually a good idea to do so for picks where there are a lot of possibilities.
Once all of the above is set, click the "Preview" button. You will be returned a page that will ipakita you what the pick will look like.
At this point you'll want to take a moment to look over your question. Ask yourself:
* Does the tanong make sense?
* Is everything spelled correctly?
* Did I leave anything out?
If you need to fix anything. Now is the time to do it. The reason is that once a pick is posted to a spot and other users start voting on it, we cannot allow you to make any major edits the pick (mainly because doing so would be unfair to users who had already responded. Imagine if someone picked choice "A" but you completely changed it to something else, thus misrepresenting what they originally had selected. That wouldn't be so good, eh?).
Helpful Ideas for Picks Images
Now before I continue, let me just say that while adding larawan to a pick is optional, I strongly urge you not to skip adding images. larawan add a lot of character to an individual pick and make the pick that much madami visually appealing.
* Tip 1: If you are creating a tanong with "Yes" and "No" responses, adding "yes" and "no" as the text for the responses will cause our default yes and no larawan to be automatically added (easy!).
* Tip 2: If you are having a hard time finding images, here are a few ideas for you:
1. Grab an image from link (e.g. thumbs up/thumbs down, male/female symbols, smileys and more...). Feel free to add to this collection too if you ever find an image that could be commonly used - just make sure you tag it "picks".
2. Check out the image gallery for the spot you're in. It's possible that there is a litrato or icon that's just right for what you want.
3. Find an image via image search. Some of the best sites for this are: link, link and link. When you find an image you want to use, save it to your computer OR use a screen capture utility (more on this below).
4. Remember: You don't always need the *exact* image in order to have an effective pick image. Example: Maybe you wanted to add a choice that dealt with a character from a popular TV show's obsession with beets. Sure it would be great to find a picture of that character holding a beet but it's just as effective to find a picture of a bunch of beets (and probably a lot easier too).
Tip 3: Square shaped imaged are used for the picks. madami specifically: for 2-choice picks we'll display 160x160 pixel images. For 3-or-more-choice picks we'll display 100x100 pixel images. I tell you this because it means that, for 2-choice picks, you'll want larger larawan and for 3-or-more-choice picks you'll want AT LEAST 100x100 pixel images. If you upload a 20x20 image, it will most likely look pixelated and terrible :-)
Tip 4: If you download a horizontal or landscaped image, you may end up with some unexpected cropping. The best way to deal with this is to either download a square image OR use a screen capture tool that allows you to effectively create a square image on the fly. Otherwise, make sure your subject is in the center of the image. If you're uploading an image that is taller than it is wide, the tuktok and bottom portions of the image will be cropped to make the image square (hence a lot of lopped off heads on picks where the original image had someone's head at the tuktok of a tall image). If the image is wider than it is tall, equal portions from the left and right sides of the image will be cropped. Again, this is done to make the image square for use in the pick. In my experience, wide larawan are less problematic since what you see in the middle of the picture is what you'll get (sans the sides).
Tip 5: Using a screen capture tool is often the best way to grab well-suited, properly sized larawan for a Fanpop pick. The instructions below may seem lengthy, but once you get the hang of it, it's actually pretty easy.
Here are the two tools I recommend for Windows and Mac users respectively. Both are completely free to download and use.
* Windows users: link (free)
* Mac users: link (free)
link crash course (for Windows folks):
Setting it up:
* Download, install and run the application.
* Under the "From" tab, make sure that "rectangle area" is the capture mode enabled.
* Open the application and click on the "To" tab.
* Under "copy captured image to", check "file" (and uncheck clipboard).
* Set the "file type" to .jpg
* Select the folder where you want your larawan to be saved.
* Click "Stand By" to keep ScreenHunter at the ready and return to your browsing.
Capturing images:
* Return to your browser and paghahanap for larawan on link, link, link or anywhere else.
* When you find an image you want for your pick (thumbnails may be too small, so try to view the full sized image), hit your "F6" key.
* Your cursor will change to a crosshair. Using the cursor click and drag to draw a square around the portion of the image you want to capture. When you have the screen capture you want simply release the mouse button.
* The selected region will be saved to the folder you selected during setup as a .jpg file.
* Now you can add the saved image to your pick.
link Crash Course (for Mac folks):
Setting it up:
* Download, install and run the application.
* When the application is running, it will appear in the upper right corner of the page (in the toolbar) as a scissors icon.
* Click on the icon and select preferences.
* Set the target folder for larawan to be saved to.
Capturing images:
* Return to your browser and paghahanap for larawan on link, link, link or anywhere else.
* When you find an image you want for your pick (thumbnails may be too small, so try to view the full sized image), go to the InstantShot scissors icon, open the menu and select "Shoot inside a rec -> To Jpeg file"
* Your cursor will change to a crosshair. Using the cursor click and drag to draw a square around the portion of the image you want to capture. When you have the screen capture you want simply release the mouse button. (IMPORTANT: Be sure to ilipat your cursor away from the selected region when you release the mouse button or InstantShot might capture an palaso cursor in the final image).
* The selected region will be saved to the folder you selected during setup as a .jpg file.
* Now you can add the saved image to your pick.
Spread the Word
Once you've created your pick it will appear in the spot in which you created it. fans in that spot will be able to vote and comment on the pick almost immediately. But what if you want to get folks who aren't on Fanpop to sumali in on the fun?

How nice that you should ask, since we current provided 3 ways to share your picks (all appear at the bottom of the results page for each pick):
1) IM them the url (immediate gratification)
2) Use the "Share this Question" link to quickly and easily shoot them an email about the pick (less immediate, but very easy)
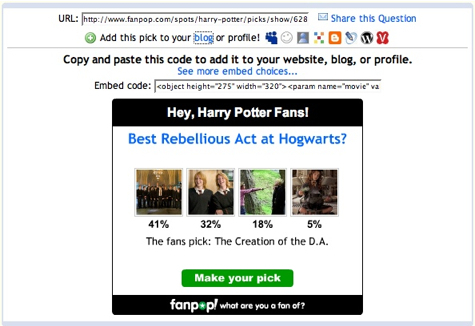
3) If you have a blog that or a bista sa tagiliran on a social networking site like MySpace, you can easily pasted an embeddable version of any pick sa pamamagitan ng click on the "add this pick to your blog..." link and copying and pasting the embed code on your blog or social network profile. The embedded "widget" will ipakita your mga kaibigan what the current results for the pick are as well as display your personal selection.
Odds and Ends
Here are a few other things to know about picks:
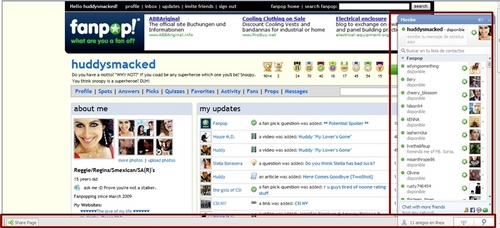
* If you want to keep track of what other fans are saying on your picks, be sure to visit your "my profile" page and look at the "my updates" module.
* Your bista sa tagiliran page keeps a history of all your picks. To view all the picks you've ever made, go to "my profile" and click on the "Picks" link near the tuktok of the page. You can view picks from individual spots sa pamamagitan ng using the spot filter (useful if you only wanted to see your picks for "Food" or "Harry Potter").
* You can view all the picks in a spot that you have NOT answered, sa pamamagitan ng going to the spot and clicking on the "Picks" link (grey bar below the spot banner). Click on the "filter by:" menu and select "unanswered". The resulting listahan will ipakita you tanong you have yet to answer.
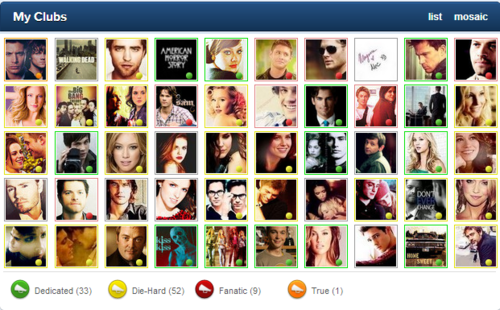
* You can give "props" to other fans for picks that you really enjoy sa pamamagitan ng going to their bista sa tagiliran page and clicking on the "props" link. I strongly encourage you to do this. It's a great way to let others know that their efforts are appreciated. And getting pagpaparangal is just as much fun too (the image below shows you a collection of "props" medalya on a user bista sa tagiliran page).

Picks Inspiration - Learn from the Best!
If you ever run out of ideas for picks, don't hesitate to check out the picks of some of most celebrated and prolific pick creators. Here's just a handful of my favorites (apologies in advance to any who have been left off this listahan -- I can't listahan everyone and frankly, there are just too many great Pick Masters to list!):
* link
* link
* link
* link
* link
* link
* link
* link
And while my picks may pale before other Pick Masters, I may as well pimp my own picks so that I can get madami people to vote on them ;-)
* link
[i]That's it for now! Please comment below if you have any feedback for the feature or the guide or if you think you have a great collection of picks that you've created (let the other picks enthusiasts know).


Fanpop is supposed to be a fun place for people to share their ideas, ask tanong and find out about some information, but lately fanpop is just used for people to like you or for you to be the best.
I know everybody likes being good and having lots of fans but that's not the point of fanpop.Infact one person even did a pick that sinabi do you like me!
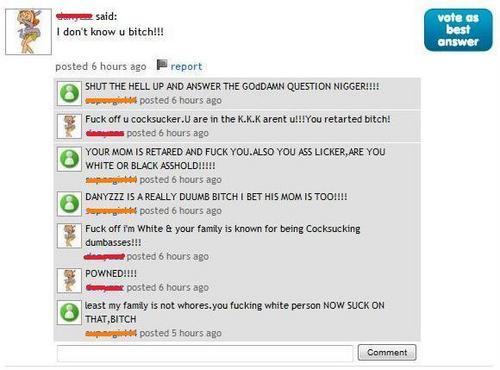
I also have seen that their have been alot of arguments over fanpop in alot of spots which is ruining it for everyone.
I know everybody likes being good and having lots of fans but that's not the point of fanpop.Infact one person even did a pick that sinabi do you like me!
I also have seen that their have been alot of arguments over fanpop in alot of spots which is ruining it for everyone.